As
my husband and I work towards becoming debt free and getting rid of
excess I am becoming more and more aware of how society has become a
slave to Capitalism and manipulated by marketing and advertising.
Consumerism has become a full-contact sport, a hobby, a panacea for
whatever ails us. We are sicker, fatter, poorer and unhappier than
ever. We must stop being sheep led by a capitalistic shepherd whose
only concern is the almighty dollar and their bottom line.
Wednesday, April 30, 2014


Tuesday, February 11, 2014
Finding my Joy (and Balance)....Again
I have great ideas. I am always thinking about how I am going to get in shape, lose weight, get off my diabetes meds, have muscles. It never happens. I can't get off the couch. I have spent a great deal of time trying to figure out why.
I set up these elaborate plans of doing my weightlifting Tuesday/Friday/Sunday (which workout will I do, how much weight should I use, will my shoulder be loose enough to hold the bar on my shoulders), followed by a mandatory 30 minutes of yoga. Cardio and yoga on the other days and karate every day for a mandatory 30 minutes. I spend a great deal of time trying to balance that out with teaching my yoga class and leading my karate class (don't want to be too tired!). Oh and which day will be my rest day. Blah, blah, blah.
I've spent countless hours in self-examination as to why I can't do this. Why don't I have the drive to make healthier choices? Low self esteem? Low deserve level? Laziness? Medication? High blood sugar? Low blood sugar? Blah, blah, blah.
Finally it hit me this morning like a ton of bricks (weights?). I have managed to suck the joy and fun out of the entire thing. I love going to karate class and yoga class (which I don't do because I've set up rules on how often I should go and get bogged down trying to decide which class and how shall I schedule my other stuff around it. More blah, blah, blah.
I've killed off all of the spontaneity, fun, joy and pleasure of moving my body and replaced it with rules and schedules and restrictions. No wonder this isn't working. So today I am working toward regaining that joy and balance. I have five workout options: weights, treadmill, stationery bicycle, karate and yoga.
I've recently discovered Spotify (it's a free music app where you can listen to all kinds of music and set up personal playlists and I'm sure there are other things but I've just gotten it and haven't investigated it fully (I was probably too busy setting up my workout plan).
I was watching the mens' portion of the Olympic team figure skating and Jason Brown was skating to music from Riverdance called 'Reel Around the Sun' which was amazing music for an even more amazing skater. I grabbed my iPod and found an album containing the piece of music on Spotify and I'm listening to it as I write this and it will be my workout music this morning (or at least until I decide I want something else).
But I digress. Back to the main point. My workout today will consist of any or all of my five workout elements in any order and in any duration. The point here is to rediscover the joy of movement and to, well, move. Earlier I was doing yoga which segued into karate punches and kicks, all spontaneous and joyful. I feel like my I've allowed my inner child to come out to play!
Now who wouldn't want to do something that makes one so happy? Find your joy in movement and give yourself over to it. Let your inner child out!
Wednesday, January 29, 2014
DIY FUN: Lip Balm
We had a small 'crisis' this evening: my husband's tube of lip balm disappeared out of the medicine cabinet. A small thing really, until your lips are burning, dry and chapped which is a fairly common thing with the Polar Vortex and below zero temps and windchill.
Normally, I would have a stash of Chap Stick in the cupboard but in my DIY mindset, I haven't bought any lately. I do, however, have a lip balm recipe from WellnessMama.com and empty tubes from MountainRoseHerbs.com (they cost 30 cents apiece!!!!) at the ready. In the meantime, I gave hub my tube of lip balm to keep him happy while I sprang into action!
I pulled out my 3-ring notebook of recipes and quickly found what I was looking for and you can find Wellness Mama's recipe below. I made half a batch as I only had 8 tubes on hand. I opted not to add any tint but I did add 5 drops of peppermint oil for fragrance.
I put the ingredients into a small jar in a hot water bath and melted them, added the Peppermint Oil and here's where it got a little um..sticky. I tried using a little metal funnel which promptly cooled the mixture and clogged. A metal skewer removed that. Also, it tended to cool as I poured it into the tubes. Pouring it directly into the tubes worked well as long as I moved quickly but poured slowly. I used a little scraper I had and scraped the cooled balm off the inside of the jar and remelted it and continued on. Not a big deal but it took a little time. I think I will be a bit faster next time now that I've done it once. Be careful to place the tubes upright to cool in a place where they won't get bumped. When cool, use a paper towel to wipe off the outside of the tube and then put on the cap.
I took a tube to my husband and he was thrilled! Especially when I told him that it cost a lot less than what we had been purchasing. I can't wait to share it with my kids and see what they think.
Estimated cost: $1.60/tube. A little more than Chap Stick but much less than lip balm sticks using similar ingredients:
Burt's Bees Beeswax Lip Balm retail price $3.29 Vitacost price $2.63
Dr. Bronner's Sun Dog's Organic Lip Balm retail price $3.24 Vitacost price $2.69
Alba Un-Petroleum Lip Balm retail price $2.75 Vitacost price $1.79
Aubrey Organics Lip Balm retail price $2.95 Vitacost price $2.19
A definite DIY Success! Have you ever made lip balm? Would you consider trying to do it?
Follow me on my DIY Adventure!
Normally, I would have a stash of Chap Stick in the cupboard but in my DIY mindset, I haven't bought any lately. I do, however, have a lip balm recipe from WellnessMama.com and empty tubes from MountainRoseHerbs.com (they cost 30 cents apiece!!!!) at the ready. In the meantime, I gave hub my tube of lip balm to keep him happy while I sprang into action!
I pulled out my 3-ring notebook of recipes and quickly found what I was looking for and you can find Wellness Mama's recipe below. I made half a batch as I only had 8 tubes on hand. I opted not to add any tint but I did add 5 drops of peppermint oil for fragrance.
I put the ingredients into a small jar in a hot water bath and melted them, added the Peppermint Oil and here's where it got a little um..sticky. I tried using a little metal funnel which promptly cooled the mixture and clogged. A metal skewer removed that. Also, it tended to cool as I poured it into the tubes. Pouring it directly into the tubes worked well as long as I moved quickly but poured slowly. I used a little scraper I had and scraped the cooled balm off the inside of the jar and remelted it and continued on. Not a big deal but it took a little time. I think I will be a bit faster next time now that I've done it once. Be careful to place the tubes upright to cool in a place where they won't get bumped. When cool, use a paper towel to wipe off the outside of the tube and then put on the cap.
I took a tube to my husband and he was thrilled! Especially when I told him that it cost a lot less than what we had been purchasing. I can't wait to share it with my kids and see what they think.
Estimated cost: $1.60/tube. A little more than Chap Stick but much less than lip balm sticks using similar ingredients:
Burt's Bees Beeswax Lip Balm retail price $3.29 Vitacost price $2.63
Dr. Bronner's Sun Dog's Organic Lip Balm retail price $3.24 Vitacost price $2.69
Alba Un-Petroleum Lip Balm retail price $2.75 Vitacost price $1.79
Aubrey Organics Lip Balm retail price $2.95 Vitacost price $2.19
A definite DIY Success! Have you ever made lip balm? Would you consider trying to do it?
Follow me on my DIY Adventure!
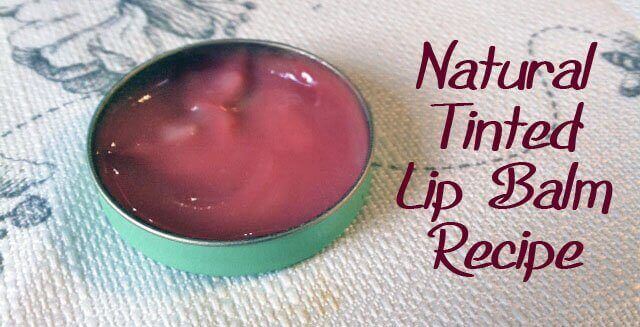
Wellness Mama's Natural Tinted Lip Balm Recipe
Prep time
Cook time
Total time
Author: Wellness Mama
Ingredients
- 2 tablespoons coconut oil
- 1 tablespoon beeswax pastilles (or 2 Tablespoons if making in lip chap containers)
- 1 tablespoon Shea Butter or Cocoa Butter
- This base recipe will fill about 6 small tins or about 10 plastic lip chap containers.
Instructions
- Melt the coconut oil, beeswax and shea/cocoa butter in a glass jar sitting in a small pot of simmering water (not boiling) and stir gently until melted (be careful not to get any water into the mixture).
- When melted, carefully stir in any colors or essential oils, if using. My favorite is lemon and vanilla for scent and a little red coloring or cocoa powder for color. A couple drops of peppermint will make it similar to Burt’s Bees Lip Chap.
- Once colors/scents are mixed in, use a dropper to transfer to tins or lip chap containers. Let cool.
- Apply the versions in the tins with your finger or use the version in plastic container as you would regular lip chap.
Notes
Optional Add-Ins
For Red Hues: ⅛ teaspoon of beet root powder
or 1 drop of natural red food coloring with no chemical additives.
NOTE: Add these very slowly as a little goes a long way! I added one
drop of natural red food coloring to the recipe above!
For Brown/Tan
Hues: ¼ teaspoon (or more for color) of organic cocoa powder, a tiny
pinch of cinnamon or turmeric to get the shade you want
For Scent: A
drop of essential oil of choice (optional)
________________
Tuesday, January 28, 2014
DIY FUN: Nail Butter
I have spent hours wandering around the internet looking for DIY cleaning and beauty products resulting in a mixed bag of emotions: Excitement to find a way to make something useful which will allow me to use natural products and save money, Frustration at not being able to find what I am looking for, Disappointment when things didn't work out so well and Joy and Happiness when I find something that works.
Sometimes in my wanderings I find recipes for things I didn't realize I needed. For example, I discovered Ms. Rosie Velt (MsRosieVelt.com) who shared a quick and easy tutorial video for nail butter aka a cuticle and nail treatment on YouTube: https://www.youtube.com/watch?v=dADybHsuKkM
Here is her recipe for 2 ounces. I took me about 10-15 minutes to make this.
1 ½ oz - Shea Butter, nourish and repair dry, cracking cuticles
½ oz -- Beeswax, softens cuticles and creates a long-lasting protective coating against the elements
1 tbs - Coconut Oil, has softening properties which help keep nails healthy and strong while keeping cuticles moisturized
1 tsp -- Olive Oil, helps soften and moisturize cuticles
5 drops - Tea Tree Oil, antibacterial properties
2 oz Jar, to store cuticle cream for on the go use
I added 5-10 drops of Lavender Essential Oil because I adore lavender!
Melt all ingredients (except the jar and the essential oils) in a re-purposed glass jar or glass Pyrex measuring cup in a pan of very hot water. Remove the jar/measuring cup from the water. Be careful! It's hot!!! Add your EO's and pour into your container(s). Let it cool and there you go!
Run a fingertip across the cooled product to warm it and then rub the balm on your finger into your nails and cuticles. My nails are no longer dry and brittle, my cuticles look nice. It's only been a few days so I can't say whether or not my nails are stronger, but they are definitely more hydrated and less brittle and look nicer. I keep a tin near my usual 'spot' on the couch to apply when I'm sitting there as well as a tin on my nightstand to apply at bedtime.
And there we go! A DIY Success! Are you going to try this? Have you made something similar?
Follow me on my DIY Adventure!
Saturday, January 25, 2014
DIY Disappointment
I bravely entered the DIY craze this year. I pored over the information on WellnessMama.com and ordered wonderful things like Shea Butter and Castor Oil and Cocoa Butter and Beeswax...and Castille Soap from a beautiful, easy to navigate, website, MountainRoseHerbs.com.
I've made hairspray and toothpaste and cuticle cream and wipes. I've made body powder and shaving creame and salt scrubs and even a body scrub with coffee and vanilla. I was so happy re-purposing containers and making simple, homey labels with masking tape and a Sharpie. I even put Henna in my hair. Yes, I've spent hours surfing the internet looking for recipes and rejoicing in being non-toxic and environmentally-friendly and frugal.
And then I attempted to make shampoo. Noticing that my daughter, aged 20, was getting low on her shampoo, I whipped up a batch of coconut milk shampoo from a recipe that I've found all over the internet containing coconut milk (I made it from scratch), Castille Soap, Water, a little Vitamin E and essential oils.
I gave her the shampoo to try and ran off to do some errands. Upon my return I eagerly asked her how she liked the shampoo. She hated it. Upon further inquiry I was informed that it became a sticky mess and she had to use her regular shampoo to get it out. I was crushed.
Back to the internet. After more searching, I discovered that Castille Soap does not like hard water as it binds with the minerals in the water and gets sticky. Castille Soap is named after soap originally from the Castille area of Spain made from olive oil. Today it has a broader definition and refers to vegetable-based soaps.
I love my house. I've been here since December, 1986. We have over nine acres, six acres of it is wetlands, and we are near civilization. I, however, have a love/hate relationship with my water. We have a well which means that, while we don't have city water and the chlorine that comes with it, we have iron. Lots and lots of iron. Our water is so hard, you can get a concussion just standing in the shower. We do have a whole-house water softener which helps but it's not a consistent level of softness and tends to get clogged. We also have a reverse-osmosis water filter at the kitchen sink for drinking and cooking.
Back to the internet...again. This time to see if I could find an alternative to Castille Soap, a different DIY shampoo recipe or a suggestion on anything I might add to the Castille to make it not do what it was doing.
I found many websites with the same or similar recipe. I found "no 'poo" recipes (washing the scalp with baking soda, rinsing and the ends of the hair with apple cider vinegar). I won't knock this idea until I've tried it but, well, I'm pretty sure I'm not trying it. I even found a few touting the advantages of honey shampoo (washing the hair with honey mixed with water).
So here I sit. No viable alternative to Castille Soap, no alternative shampoo recipe, no way to refill my soap dispensers (Castille and water) and I just actually read the label of my current hand soap (Method) and it contains stuff I really don't want in my house, let alone on my hands....
We need to call for service on the water softener and that will happen soon, I hope. I also hope that this will solve the problem. In the meantime, I have a quantity of hand soap and I am stuck ordering my ready-made shampoo. It IS mostly organic and person/earth friendly and I get a good price for it on Vitacost.com but, compared to making it myself, it is still pricey.
Do you DIY your own shampoo? What do you use? Do you have any suggestions? Follow me on my DIY Adventure!
Tuesday, January 21, 2014
Television vs. Meditation
Yesterday I had a tough day. As we move into fiscal responsibility, my husband and I have a great deal of anxiety. We worry about the unknown; those expenses we forgot about or the unexpected repair bill, blah, blah, blah.
I was having so much anxiety yesterday that I could not focus. I knew I had quite a few things to do but I found myself flitting both in body and mind from one task to another. I really needed to center myself with yoga and meditation but I could not settle enough to do either. What I really wanted to do was to grab another cup of coffee and plop down in front of the television and veg out, neither of which would have been constructive.
So what did I do? Posted on FaceBook, of course! This prompted a great conversation with a dear friend of mine where I was encouraged to not feel guilty about sitting in front of the television to relax. Now there is nothing wrong with this, in fact I do so frequently but it got me to thinking about the difference between meditation and plopping on the couch in front of the television. Those who meditate, understand the difference but I feel it is a good point of personal inquiry.
Relaxation in front of the television is mindless. We may think about what we are watching and have an opinion about what we are watching, but this is an externally-focused activity. It gives us an opportunity to get out of ourselves and escape into a different place. To unplug from whatever is going on inside.
Meditation, on the other hand, allows us to unplug from the external and delve into the internal. It is an opportunity to still the body as well as to quiet the monkey-mind of all those thoughts that the ego tells us are important. This allows the spirit, the center of our being, to be the star.
When I am in the throes of personal growth, be it working through an issue from the past, a conflict in the present, anything that causes me to be in turmoil, I find it very difficult to sit and be still and turn inward. I also find it difficult to be on my yoga mat because yoga also directs one to turn inward. One tool that I do utilize is my breath. Breathing in and out through the nose, deeply and fully is very calming to the body and I employ this tactic as much as possible.
So, what did I do? I cleaned out a drawer and made my to-do list which I tackled with a great deal of energy and intentional breathing and, gradually, I found my focus. I expended a good deal of energy as well as accomplished some of the things that were concerning me and I was finally able to bring myself to my yoga mat and then, finally sit and be still.
As I gain more understanding of myself, I realize that I cannot force myself to meditate or do yoga. I must listen to what I need, breathe and figure out what I have to do to enable myself to come to my mat and my meditation cushion and, most of all, give myself permission to do these things with compassion and without judgement or guilt, including plopping down on the couch and watching television for awhile.
What do you do when you are stressed? Do you give yourself time to just sit and be?
Monday, January 20, 2014
Henna Hair Happiness!
I have an odd relationship with my hair. I pretty much wash, apply gel, scrunch and ignore it until I get that rare haircut that doesn't quite lay right. It works, the hair curls on its' own, I don't have to mess with it. Get it cut every six weeks, color the roots and add highlights every other cut. Boom.
I spend about $100 every six weeks and with, our new budget, that just wasn't working but I'm only 53 and not ready to go gray.
I tried coloring my hair with coffee and tea neither of which seemed to do anything so I dove into the idea of henna. I looked at a lot of different websites and it seemed really messy and complicated. then I stumbled upon DIYBeautyTutorials.com. The site recommended using plain henna mixed in yogurt. The amounts were nonspecific so I went with 1/2 cup of yogurt and 1 teaspoon of henna, leaving it on for one hour..
I am thrilled! The grays are covered! My natural color is darker so once the highlights/color grows out, I may have to change the formula a bit.
I got my hair cut without the color/highlights and saved $60. That works out to about $500 savings/year!
So far, I am putting this down as a HUGE DIY win! Follow me in my DIY Adventure as I try to save $$ and save the planet!
 |
| My hair is dark with a slight red-brown tint and blonder highlights |
I spend about $100 every six weeks and with, our new budget, that just wasn't working but I'm only 53 and not ready to go gray.
I tried coloring my hair with coffee and tea neither of which seemed to do anything so I dove into the idea of henna. I looked at a lot of different websites and it seemed really messy and complicated. then I stumbled upon DIYBeautyTutorials.com. The site recommended using plain henna mixed in yogurt. The amounts were nonspecific so I went with 1/2 cup of yogurt and 1 teaspoon of henna, leaving it on for one hour..
 | ||||
| 3.5 oz. Henna ($1.49) |
 |
| I used an old t-shirt to cover my head. The neck hole fit snugly around my head |
 | |
| The t-shirt absorbed some of the yogurt/henna mixture so I immediately put it to soak. It washed out fine. |
I didn't see a LOT of coverage and my grays reappeared the next day. It takes three days for the color to fully develop and I didn't see a lot of change. Five days later I repeated the process but DOUBLED the henna (2 teaspoons in 1/2 cup of yogurt). After three days, here is what it looks like:
 |
| 1/2 Cup of yogurt, 2 teaspoons of henna, left on for 1 hour |
I got my hair cut without the color/highlights and saved $60. That works out to about $500 savings/year!
So far, I am putting this down as a HUGE DIY win! Follow me in my DIY Adventure as I try to save $$ and save the planet!
Subscribe to:
Posts (Atom)